This is default featured slide 1 title

Go to Blogger edit html and find these sentences.Now replace these sentences with your own descriptions.This theme is Bloggerized by Lasantha Bandara - Premiumbloggertemplates.com.

This is default featured slide 2 title

Go to Blogger edit html and find these sentences.Now replace these sentences with your own descriptions.This theme is Bloggerized by Lasantha Bandara - Premiumbloggertemplates.com.

This is default featured slide 3 title

Go to Blogger edit html and find these sentences.Now replace these sentences with your own descriptions.This theme is Bloggerized by Lasantha Bandara - Premiumbloggertemplates.com.

This is default featured slide 4 title

Go to Blogger edit html and find these sentences.Now replace these sentences with your own descriptions.This theme is Bloggerized by Lasantha Bandara - Premiumbloggertemplates.com.

This is default featured slide 5 title

Go to Blogger edit html and find these sentences.Now replace these sentences with your own descriptions.This theme is Bloggerized by Lasantha Bandara - Premiumbloggertemplates.com.

Showing posts with label windows_basic_tutorial. Show all posts

PowerPoint Action Button Creating Tutorial

PowerpointPowerPoint Tutorial – This is a Common Question, How can I Create a PowerPoint Action Button in a Slide Show? This is Not a Difficult Work. You can do it Without Any Difficulty. Open Ur Any Existing Power Point File. At least You Need More than One Slide. Ok, Now Follow My Tutorial Carefully.
How to Create Action Button – 
⇒ Open Ur PowerPoint File. 
Action Menu
⇒ Select Ur First Slide and Go “Slide Show” Menu (TOP) 
⇒ Expand it and Select “ACTION Setting”. 
⇒ Now Add Ur Action Button from “Action Setting” Sub Menu. 
⇒ First We Add “Previous (2nd Line 1st Tab)” Action Button. Draw it in Ur Selected Position (In My Case – Bottom) 
⇒ Now a New Window will be Open. No Need to Change Anything from It. Just Press Ok. 
⇒ Like Above You can Also Add “HOME” and “Next” Button.
Button Customization – 
⇒ Select Ur Button. Now Go “Format Auto shape” from Context Menu. 
⇒ Now U can Change Ur Button Color, Size, Position and Many More. 
⇒ Now Select Ur All Button (In My Case – 3) by Dragging Mouse and Copy It.button Preview 
⇒ “Paste” it in Ur All Slides. 
⇒ Press “F5” for a Slide Show. Test Ur Button Action. It’ll Work Properly.

How can I Add Password to Word Document

You can Add Password to Ur Important File Very Easily. In Windows XP and Windows Seven the Process is Same.This Tutorial I Show, Process of Making a Password for Word Documents. 
⇒ Open Your Word Documents File. 
⇒ If You Want this Files Password Protected “Save” it from “Save As” Option. 
⇒ Look New Windows “TOP RIGHT” Side (image-1)
(Image-1) - Click to Enlarge
⇒ Click The “TOOLS” Button and Select “SECURITY OPTION” Now Open “Security” Window.
(Image-2)
⇒ Now Give Same Password “Password to Open” and “Password to Modify” Box. Press OK. (image-2) 
⇒ Save Your Word File in Any Location.You can Also Set a Password Using ZIP or RAR Method. This Method Applicable for Any Kinds of Files and Folder.

Password Protect a Folder in Windows

We can Create Windows Password Protect Folders or to Lock Folder without any Software. To Protect a Folder with Password We Need to Follow Some Steps.
Put Password on Folder Without Software – 
It’s Very Easy and Flexible Process to Lock Folder Without Software. 


⇒ First Select Your Folder Where You Want to Give a Password. 
⇒ From Context Menu Select “Send to” Compressed (Zipped) Folder [Ensure It Your Folder Is Not Empty]⇒ A New Zip Folder will Open Beside Your Original Folder with Same Name. 
⇒ Explore Your ZIP Folder and Press Right Mouse Button in a Blank Place and Select “Add a Password”.⇒ Now When You Want to Open Any Item from Your Password Protected Zip Folder You Need to Put Password.
Software for Password Protecting Folders –
Using WINRAR You can also Protect a Folder with Password. 
⇒ First Install Your Winrar Software.
⇒ Select Your Folder Where You want to Put a Password.
⇒ From Context Menu Select “Add to Archive”. 
⇒ Save Your Password Protected Folder Path and Select Your File Type from General Menu Tab.
⇒ Now Go “ADVANCED” Tab and Click “Set Password” Button. Give Same Password.
Now We have done Our Work.

Windows power management, Hibernate Customization

We can Customize Windows Power Option. Hibernate is the Best Windows Power Saving Mode. Custom Power Option We can Enable from Control Panel. By Default Your Monitor Turn off After Twenty Minutes and Your PC will Sleep After 1hour.Windows Power Customization Process –
 Enlarge Image by Click

change CP view (C2E)
⇒ From Start Menu to Go Control Panel.

⇒ For Windows Seven Change View to Large Icon
⇒ Now Open POWER Option
Turn off Display time
⇒ From Left Context Menu Select “Changes When the Computer Sleeps (For Seven)’⇒ Now Select Your Time for "Turn off the Display" and "Put the Computer to Sleep" time.
⇒ In My Case I Select Both is Never.
Power Button Customization –
If Your Keyboard have Power Button (Left Site of Num Lock Light) You can Change Power Button Action Mode. Press Right Button to TASKBAR and Select Properties. Now go to "Start Menu Tab". If You have Hibernate Mode Enable You can Also Do It. Neither You can Select “Restart, Shut down, Sleep, Logoff“ Any One Mode. In My case I Select Hibernate Mode.

[Note : Click Every Image for Enlarge]

Tutorial of Making All Format Subtitles

Manually We can Create Subtitle by Using Software. It's Very Easy Process. Read this Tutorial for doing It. You may be Tired to Find Your Desired Subtitle. Many Movie Subtitle Contain in Internet But Song Subtitle are Very Rare in Internet. But this Post I will Show, How can We Create a Subtitle.

TERMS
** First Download This SUBTITLE Creator Software from HERE
** You Need Java Software to RUN this Software (6+ Version)
If You Have Not It you can Download it From Here.
** Collect Your Song Lyrics (For English Song You can Go www.elyrics.net )
Create Your Subtitle Now:
You Need to be Patience. Every Second Difference all thing can be Change.
** Ok, Install Your Above Downloaded Software and Run It.
** Press Ctrl+N or Go FILE >> New >> File
(Image-1)
** Look Above Image, Copy and Paste Subtitle Bar to Look Your Song Range.I suggest you, do it As Possible Maximum. You can add it also Later.
** Now Open Your Lyrics, also Open Your Song in Any Player (KMP is Best)
** Copy from Lyrics Song First 2/3Line in First Subtitle Bar.
** Very Important: Now Set Your Time, First Set End Time and Double Click the Lock Button, Now Set Start time and Click the Duration Lock Button. You Select your time from Your Player.
Follow Below Images.
image-2
image-3
image-4
** Save it from Save As Option.[.ass or .srt format]
(Just First Line, Not Do More)
** Close Your Subtitle Creator Software. [You must do it]
** Again Open it and do this Work Until Finish Your Song.
** After Finishing Your Subtitle Creating Play Your Song[KMP] and Drag Subtitle File in Your Player.
** If You want When I Play Song Subtitle Automatically Come, Go this Post.

Windows Dextop Background Change Disabled

If You Want, Nobody can Change Your Dextop Background. You can Do It from RUN Command. It's Work Both Windows XP and SEVEN. It's Very Easy, Just Follow Beneath Process:

 ** First Set the Background Which Image You Want to Keep Unchanged.
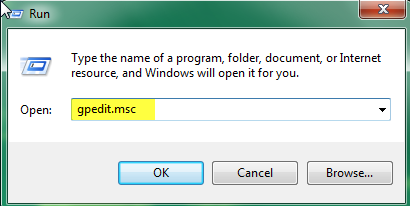
** OK, Go to "RUN" Command.
** Write "gpedit.msc" and Press Enter.
** Now Open the Local Group Policy Editor.

** Double Click the "ADMINITRATIVE Template" Button.


** Follow "DEXTOP" to "DEXTOP" Navigation Link.


** Now Open "DEXTOP Wallpaper" Navigation Link


** Enable It, Give Your Dextop Background Image URL in Wallpaper Box
(In My Case "G:\WALLPAPER\1920_1080=IMAGE\SKY_GRASS.jpg")
Set Wallpaper Style "Stretch" Apply >> OK.

We Complete Our Misson, You can Now Test It.


DISABLE Autorun (Turnoff AUTORUN)

The Full Process is Like Below:

** Click Start Button and Select RUN Command.
** Now Write in RUN Command → gpedit.msc ←


** Open LOCAL GROUP POLICY EDITOR Page.
** Double Click the → Administrative Template ←


** Now Double Click the →SYSTEM ← Navigation Link.
** Open the TURN OFF AUTOPLAY Navigation Link.
** Enable it for All Drive.

Ok, Now You Save, No Auto run File will be Open from Any drive (e.g. USB Stick/CD...).Your PC are Save from Virus.

Format Virus Infected PENDRIVE by CMD

If in Your System are Not Contain Any Active Antivirus,You can't Able to Format Your Pendrive.But You can do it Without Using Antivirus. Command Prompt Help You to Format Your Virus Infected Pendrive.The Full Process is Like Below:
 01. Open RUN Command (Start > Run)
02. Write "cmd" in Run Command.


03. Command Prompt Now Open; Show Your C Drive Directory.

In My Case "c:\users\siraj>"

04. Now Write "Format Your USB Drive Letter Name.
 

In My Case My Drive Name: J; So Instruction Like Below:


"c:\users\siraj>format J:" Now Press Enter.

05. OK, now Your USB Drive Format is starting.

06. After Few Times Your Format will be Successfully Completed.

Now Your USB Drive is Virus Free.