This is default featured slide 1 title

Go to Blogger edit html and find these sentences.Now replace these sentences with your own descriptions.This theme is Bloggerized by Lasantha Bandara - Premiumbloggertemplates.com.

This is default featured slide 2 title

Go to Blogger edit html and find these sentences.Now replace these sentences with your own descriptions.This theme is Bloggerized by Lasantha Bandara - Premiumbloggertemplates.com.

This is default featured slide 3 title

Go to Blogger edit html and find these sentences.Now replace these sentences with your own descriptions.This theme is Bloggerized by Lasantha Bandara - Premiumbloggertemplates.com.

This is default featured slide 4 title

Go to Blogger edit html and find these sentences.Now replace these sentences with your own descriptions.This theme is Bloggerized by Lasantha Bandara - Premiumbloggertemplates.com.

This is default featured slide 5 title

Go to Blogger edit html and find these sentences.Now replace these sentences with your own descriptions.This theme is Bloggerized by Lasantha Bandara - Premiumbloggertemplates.com.

Showing posts with label blogger_recent_post. Show all posts

Blogger Sitemap Error Correction Tips

sitemap thumbSitemap is Very important for SEO. But Sometime Google Webmaster would not accept Regular Sitemap URL (rss.xml/atom.xml) for Blogger Site. For My Site it would be happened. Here I Give You Some tips which help you to accept your Sitemap in Google Webmaster very quickly.
What I Need to Do – 
It’s Very Easy Task. Go Google Webmaster and Sign in with Your Gmail Account. Select "Sitemap" from "Site Configuration" Menu. Now Click "Submit a Sitemap" Button.Submit two Sitemap for your Site.
Now We Need to Change Our Regular URL – 
 ⇒ Your Regular Sitemap URL is – www.yoursite.com/rss.xml change it to >>
⇒ www.yoursite.com/rss.xml?redirect=false&start-index=1&max-results=999
⇒ Another Regular Sitemap URL is – www.yoursite.com/atom.xml
⇒ Change Above URL to – www.yoursite.com/atom.xml?redirect=false&start-index=1&max-results=999
sitemap image
I ensure you; Maximum 10 minutes Google Webmaster Take to accept your Sitemap.

Add Social Share Button with Google +1(plus One)

Social Plug-in imageFrom this Tutorial You can Learn "How can we add Social Share Button (with Google Plus one (+1) below the post". Recently Google added “Google plus One (1) ” Recommendation Button like Face book like Button. Social Share Button is so important for SEO. All Social Site have High PR, If You can Add Your Site Link to their Site it will be Very Easy for You to Add Your Link in Search Engine. People Find Your Site Very Easily.
About Google plus One –
 google +1 (plus one) button Google plus one is a Recommendation Button, Which Google Recently Added to their Service. The Purpose is Clear, Google want to Add People in their Search Engine. If You Like Any Post you can tell Google by Google plus One Button. Previously this was Impossible. I think its Like Democracy System and it must be good for Webmaster.

How to add Social Share Button below Your Post –
 
⇒ Just Put the above Code in Your Template head Section.(in <head> to </head> tag) Code above head 
⇒ Copy below code and Paste it Where You want to Appear Share Button. 
⇒ For Blogger – 
 Expand widget
⇒ Go “Design” to “Edit HTML”. Keep Backup Your Template and You Must Need to Enable “Expand Widgets Template” 
⇒ Now Paste the Below code After the Line –
<divclass='post-footer'>

                    <div class='post-footer-linepost-footer-line-1'>
 Add after fotter-line-1

 
⇒ Now Save Your Template.
⇒ Final Image will be Like Below -
 final share button

Google Apps for .co.cc Domain-Create Your Own Email

thumbYou can Create a Free Google Apps Account for Your Own Email Address by Using Free .co.cc Domain. First You Need a Free .co.cc Domain and Setup It for Your Blogspot Account. Google Apps Provide You Full Gmail Advantages but You will get an Own Email ID. You can Also Create an Own Email Address for Your Top Level Domain.
How to Create Own Email Address – 
⇒ Sign Up Here for Your Free Google Apps Account. 
⇒ Now You Need to Verify Your Domain. For that go Setup Menu to “Verify Domain Ownership” Tab. Select Alternative Verification Method.
⇒ Use “Add Meta Tag in Ur Template” System for Ur Domain Verification. It’s Easy and Risk less Fastest Process. Google Apps Give You a Meta Code.
⇒ Add it to Ur “Template” any Place of head Part. Save Ur Template and Go Back Google Apps. 
⇒ Go “Setup Email” Tab. Select Ur Domain Host (If your Host Not Listed then Select “My Domain Host isn’t Listed”). 
⇒ Now Add All “MX” Records in Ur DNS Control Panel (Look Carefully “MX Records Image”)image-1 
⇒ Save Ur Setting and Go Back Google Apps.
⇒ Click “I’ve Completed this Steps” Button. 
⇒ Ok, Ur Email is Active Now. U can create Multiple Email (Max. 10 for Free Google Apps) Account with Ur Own Domain Name.Enjoy your Own Email ID.

Free Domain Registration-Get Free .co.cc Domain

.CO.CC.CO.CC is the Largest Free Domain Provider. Without Any Cost You can Get More than One Free .co.cc Domain. If it’s Not a Top Level Domain but this Domain also have a Great Value. You can Change Your Blogger Address by Using this Domain. It’s Very Easy to collect this Domain and by Using this Domain You can Create Google Apps Account for Your Own Email ID. This Post I Show how can you get free .co.cc Domain and the Process of .co.cc Setup for Blogger.
How to get .co.cc Domain – 
⇒ For .co.cc Domain go – www.co.cc Website. 
⇒ Choose Your “.co.cc” Domain Name.
image-1
⇒ Some Domain Name they can’t give You Free but it’s Number is So Few. If your  Domain Name is Not Free Available, Choose another Domain Name and Create an .co.cc Account for thats Domain.
image-2
.co.cc Setup for Blogger –
⇒ Now go Your Domain Setup Option
⇒ Select “ZONE Records (Middle)”
⇒ Now Add a “CNAME” Record Like Below for Blogger.
HOST Name your-domain-name.co.cc (without http and www)
TTL 1D
TYPE CNAME
Value ghs.google.com.
image-3
⇒ Now Press “SETUP” Button.  
⇒ Go Your Blogger Account and Click “Setting” Tab
⇒ Select “Publishing” Tab and Press Custom Domain Setup. Then Click the “Advanced Setting”. 
⇒ Put Your .co.cc Address in Domain Box, Fill Captcha and Publish it.
⇒ Now Enable Redirect "your-domain-name.co.cc" to "www.yourdomainname.co.cc" and Publish it.
I Recommend You, if You want to Build a Complete Professional Website, Buy a Top Level Domain (.com) and Setup it for Blogger.

Blogger Blog Writing Software-Windows Live Writer

By Windows Live Writer You can Write Ur Blog with Live Preview in Offline. This is Offline Blog Writer Software. I Mean, Even Without Internet You can Write Ur Blog in Your Template (Windows Live Automatically Load Ur Template). It’s Really Very Good Programs for Writing Blog in Blogger. A Lot of Plug-in Available in Windows Live Software. You can Publish Your Blog without Login in Blogger. I Tell Details Feature in BelowAbout this Software – 
 ⇒ HOME, INSERT and BLOG Account are the Main Menu in Windows Live Writer.

 HOME – 
Home Menu Preview (Click for Enlarge)
⇒ You can Manage Ur Account (Multiple or Single)
⇒ Windows Live have a Full Featured Post Editor. Without Any HTML Knowledge You can Add Anything (Title{h1 to h6},Tag, Table,…….). You can also Add in Ur Post - Map, Video, Table, Code (With Plug-in), Facbook or Twitter like Button, Hyperlink, Image. Change Ur Font Color, Type or Size as Like Ur Wish.
⇒ Set Ur Post Category , Date or Save Ur Post.
⇒ Publish Ur Post by Publish Button.

 INSERT – 
⇒ Look Left Side Div, From Here You can Add Horizontal Line, Clear Break and Read More Option (Spilt Post).
Insert Menu Details (Click on Image to Enlarge)
⇒ You can Add Table With Live Preview (Everything is Live Because You Write in front of Ur Theme).
⇒ Hyperlink, Photo, Image Album, Video, Map, Post Tag, Emoticon also Available in Insert Tab.
⇒ Plug-In :A Lot of Plug-in Available in Windows Live Writer. You can Download Any Plug-in from Get Plug-in Link.
 List of Windows Live Plug-in – 
1. Code Snippet (Add HTML Code in Ur Post)
2. Facebook Notification ( When You Give Any Post it’s Automatically Publish in Ur Facebook Wall)
3. Generate Tag (Auto Tag Creator)
4. Google Buzz (Bottom of the Post You can Add this Button)
5. Insert a Feed (Add Ur Feed by this Plug-in)
6. Insert Code (Insert Any Visible HTML or JavaScript Code in Ur Post by this Plug-in)
7. File Plug-in (Add Ur File)
8. Tweet Me and Tweet Notify Plug-in
9. And Many More Available in Windows Live Official Site.

 Blog Account – 
⇒ From Here You can Update Ur Template (If You Change It)
 How can Start –
⇒ First Download Windows Live Writer.
⇒ After Installing It Select Ur Blogger Platform.
⇒ Give Ur E-mail and Password.
⇒ After that WL Automatically Connect With Ur Site and Ur Template Available in Ur Software Background.
⇒ You can Also Add Multiple Account from “Home” to “Add Blog Account Button”.
 I Hope Ur Blog Writing will be More Easy, Stylish and Comfortable by this Software.

Blogger Blog Comment Setting and Customization

This is Heart Point for a Blog Site. If You have No Comment Option, So You have No Value. So be Careful about Your Comments Setting. Visitors Feel Interest to Give Comments When You Able to Set a Stylish and Active Comments System . Here have a Post Details about Comments Customization . But Before  of All We Need a Proper Setup About Blogger Default Comment Setup. Explore The Image (Comment Setting Image)
by Click On It and Follow It.
Comment Setting Image
I Also Tell It –
⇒ Comments – Give “SHOW” 
⇒ Who can Comment – “ANYONE” 
⇒ Placement – “Embedded Post Below” 
⇒ Comments Default for Posts – “New Post have Comments”
⇒ Back link – Enable Hide Option for It (Value of Back link for a Site) 

⇒ Comment Form Message – You can Set Default Comment Message in Comment Box (e.g. – Write Ur Comment Here….) 
⇒ Comment Moderation – By this Option You will Able to Control Spammers. But don’t enable It until You Go a Proper Position. For My Blog At least I don’t Enable it.
⇒ Comment Notification E-mail – When Some One Comments in Your Site Blogger Sent a Mail to Your E-mail. Use Individual E-Mail for this Purpose. Without Moderation You can Also Control Your Comments by this System. And It’s Good for Beginners.

Blogger Post Subscribe by email

You can Spread Your Post by email. First You Need to Active Site Feed. Go Google Feed Burner  and Active Your Site Feed. For E –mail Subscription Now Follow Beneath Method – 
⇒ Active Ur Site Feed in Google Feed Burner. Full Details about Site Feed Activation You will found to Left Link.
⇒ Login to Google Feed Burner by Your Gmail Account (Use Same Gmail Account, Which You Used to Your Blogger Site but Not Recommended ) 
⇒ Click Your Site Title (If You have No Active Site Feed in Google Feed Burner .Go Here to Know Site Feed Activation System in Google Blogger and After do that You will Found Your Site Title ) 
⇒ Now Go “Publicize” Tab and Press Email Subscription Sub Link.
⇒ “Activate” It and Now You will Found a HTML Code. Now Add it By HTML/JavaScript Gadget .
⇒ You can Customize Your Subscribed by Email Box. Find Below Red Code
style="width:140px"
<p>Delivered by <a href="http://feedburner.google.com"target="_blank">FeedBurner</a></p> 
(Same for All Site) and Adjust it to Look Your Header or Sidebar Position.Cut the Green Code.

⇒ Or Select Your Blogger Platform from “Use As Widget” Box and Press Go.From Now People Found New Post News in their Email Who Subscribed.

Blogger Custom DOMAIN Setup for All Domain

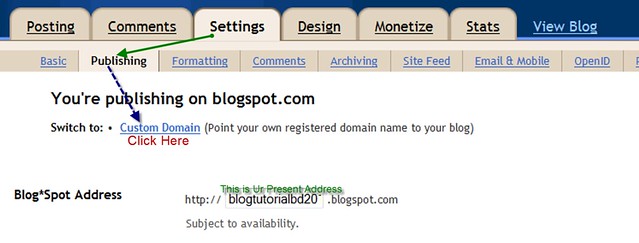
You can Use a Custom Domain for Your Blogger Site. It’s Not a Complex Process. If You Already Buy Your Domain then Just Login Your Blog Site and SETTING to “Publishing” Sub tab.  
⇒ Now Click to “SWITCH to. CUSTOM DOMAIN” Link. 
⇒ If You don’t have Any Domain You can Buy It from Google.
⇒ I Think You Already have a Domain,So Click the “SWITCH to Advanced Setting” Link. 
⇒ Before Put Your Address in “Custom Domain Box” Go Your Domain Register Company Site and Knock the DNS Management Aria. 
⇒ Below DNS Setup Instruction is Appropriate for Any Domain Register Company.
⇒ First Add a “CNAME” Record to Your DNS Control Panel.

HOST NAME TYPE ADDRESS
www CNAME (Alias) ghs.google.com.
(Never Use Full Address to Your Host Name. In Many Tutorial You will Found It But It’s Create Some Problem. I Feel it From My Experiment ) 
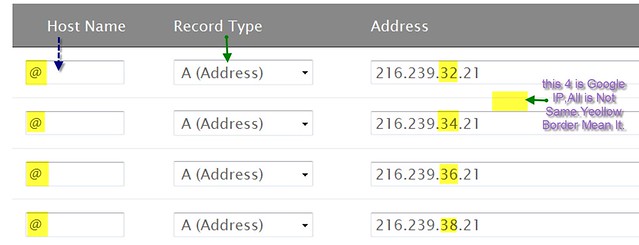
⇒ Now Add “A-Records” to Your DNS Control Panel. If Anyone Type Your Address without www, Then They Redirected to Your Site for “A-Records”. So It’s Important. Follow Below Structure and Images.

HOST NAME TYPE ADDRESS
@ A(Address) 216.239.32.21
@ A(Address) 216.239.34.21
@ A(Address) 216.239.36.21
@ A(Address) 216.239.38.21
⇒ Now Save All ur Setting and Back to Blogger Custom Domain Setup. 

⇒ Put Ur Address to “Your Domain” Box. Fill Captcha and Save It. 
⇒ Now Tick the Redirect “xxxxx.com” to www.xxxx.com and Save It.
⇒ Wait, Your Custom Address will Not Active Immidiately,It’s Take Maximum 72hours to Publish Your Site. Be Patience.Enjoy Your Top Level Domain Website.

Blogger Comment Customization

For a Professional Site You Need a Professional Comment System. Must With Full Control in Your Comment System. Look at My Comment Box, I Use “DISQUS” Comment Manage System. I can Fully Control All of My Comment, Comment Box Style, Visitor, and Must Spammers. It’s Professional Comment System. Many Stable Site (Like – CNN, Fox News, Time) Use this Comment System. If You are Interested It Continue to Read this Tutorial. But The Question is “How can U Use It?”. Read Below for Details –


⇒ First Go To DISQUS.COM  
⇒ Click the SIGN UP Button and Register Your Site With All of Your Information. I Suggest You, Use a Specific e-mail for DISQUS. It’s Help You Because All of Your Comments will Go In Your E-mail and U can Find it Easily. 
⇒ After Registering Go Quick Setup Page. Here a Option for Media Attachment (Image, Video).If U wish U can Keep It or Reject It. In My Site I don’t Accepted It. Continue…… 
⇒ Before Install Go SETTING Tab. 
⇒ Complete All Ur Setting Information. Here I Think No Need Any Description About Setting Because DISQUS Give a Full Guide About Your Comment Setup. Just Follow It.
⇒ Now Click the Install Tab and Install It for BLOGGER. Option 3 have a Button Where Say “Add Site ‘Your Site Name’ to Blogger” Click this Button and Add This Gadget  to Your Blogger Site. Your Gadget (Widget) Position is Not a Matter.
⇒ Save it and View Your Blog.After End of Every Post You can See DISQUS Comment Box Like Comment Box Image.

Blogger Site Feeds Setup Tutorial

SITE Feeds is Vital Option for Any Site. To Indexed in Search Engine it’s a Key Point. Most of the Search Engine Support RSS & Atom Feed. You Need it for Indexing Your Post to Search Engine. I will Tell Details About It in Blogger SEO Series Post. Blogger have Two Kinds of Site Feed RSS and Atom. Google Feed Burners is Most Popular Feeds Provider Site. First Set Your Site Feed Setting from Blogger.⇒ Go BLOGGER Setting  Tab and Click “SITE FEEDS” Sub Tab.
Site Feed Setup (Enlarge it by Click)
⇒ (Follow Beside Images) First Switch to “Advanced Mode”.
⇒ Blog Post Feed : Short (Add Read More Option By Default in Your Feed) 
⇒ Blog Comments Feed & Per Post Comments Feed : Full (You can Also Use “Short” [As Ur Wish] ).
⇒ Post Feed Redirects URL : Keep it Blank, Until Come Back from FEED BURNER. Open new Tab and Go to FEED Burner .

Google Feed Burner Setup 
⇒ Sign in With Your G-Mail Account .Use Same G-Mail Address (Which U Used for Blogger) for Google Feed Burner. 
⇒ Now Give Your URL in Box  and Click “Next Button”.
⇒ Select “ATOM” or “RSS” Any Kinds of Feed System (As ur Wish).
⇒ Click Next (Two Time), Now a Feed Address is Visible In front of You, Copy it and Go Back Blogger Site Feed Sub Tab. Post ur URL in “Post Feed Redirect URL” Box. Save It.